– Basic Level")
 Part 2")
 Part 1")


What are Locks in Golang?
- Locks are not just limited to Golang; they may be used in a wide variety of computer languages. In sophisticated systems, locks that restrict access to sensitive data, might result in unnecessary overhead. Then, developers must optimize it. Reader-writer locks are among the most often used methods for optimizing it.
- Golang is the primary choice for developers to comprehend the concept of locks. This is because of Golang’s support for concurrency and reader-writer lock implementation.
What Purpose Do Reader-Writer Locks Serve?
- A number of threads can access the shared data simultaneously as long as it is not changed while being read. As a developer, you should be aware that this is how reader-writer locks are made.
- Standard locks don’t differentiate between “lock for reading” and “lock for writing.” This results in unnecessary serialization. So, any thread reading the data will still need to lock it.
- Now, if one has to create a necessary separation between readers and writers, it leads to the unintended distinction between readers. And this is where the RW locks shone forth. They don’t depend on a single lock system.
Meanwhile, if you are stuck with web development in Golang, you should not hesitate in reaching out to the developers at Golang.Company.
How are Mutexes Applied in Go?
- We’ll examine race-related instances in this blog post and how mutexes may be employed to prevent them. Race situations may cause unanticipated issues since new systems are challenging to debug and repair.
- So, in this blog post, we’ll build a Go programme from scratch that can run several times in a safe manner without suffering from performance issues. And this is where we will apply the Mutex or Mutual Exclusion.
What is the Essence of Mutex?
We can prevent concurrent processes from accessing a critical section of code that has already been execute by one specific process using the mutex method.
Applying the Mutex
- Think about a client who has $1,000 in his bank account. The client then tries to add $500 more to his account. A goroutine would notice this transaction, estimate its value to be $1,000, and then proceed to deposit another $500 into the bank.
- Imagine that he also needs to make a $600 mortgage payment at the same time. The second operation will interpret the account’s initial value as $600 before the first process may deposit another $500.
- The next step is to deduct the $600 from the $1,000. The next day, when the customer checks his bank account, he will see that he has $400. This occurs as a result of the second process’s decision to disregard the value once the second goroutine was done, despite the fact that it was unaware of the original deposit.
Now, we will apply the mutex to solve the issue.
package main
import (
“fmt”
“sync”
)
var (
mutex sync.Mutex
amount int
)
func deposit(value int, wg *sync.WaitGroup) {
mutex.Lock()
fmt.Printf(“Depositing %d to the account with balance %d\n”, value, amount)
amount += value
mutex.Unlock()
wg.Done()
}
func extract(value int, wg *sync.WaitGroup) {
mutex.Lock()
fmt.Printf(“Withdrawing %d from account with balance %d\n”, value, amount)
amount -= value
mutex.Unlock()
wg.Done()
}
func main() {
fmt.Println(“Hello Everyone”)
amount=1000
var wg sync.WaitGroup
wg.Add(2)
go extract(600, &wg)
go deposit(500, &wg)
wg.Wait()
fmt.Printf(“New Balance %d\n”, amount)
}
- First, we have to define the mutex. You will observe mutex of type sync.Mutex and type int amount. Immediately after this we will go to the main function, and we will initialize the amount to 1000.
- Following this, we have two functions. These are deposit and extract functions.
- The deposit function consists of parameters like a waitgroup, i.e, *sync.WaitGroup and value of type int. The WaitGroup has an important role to play here. It waits for all of the goroutines to finish the tasks they are handling.
- When we call the .Lock() function, we achieve the mutex lock that is highlighted in the var.
- Following this, you get to see “Depositing %d to the account with balance %d\n”, value, amount. As you can observe, we are passing the parameters value and amount.
- Next, we do amount +=value
- We will then unlock the mutex when we see that the execution of the crucial code is over. How do we do so? Well, using the mutex.Unlock().
- Next in this function, we will call the wg.Done(), to show the Go program that it has finished the execution process.
- The next function extract is exactly the same as deposit function in that it accepts parameters: value of type int and a waitgroup, i.e, *sync.WaitGroup.
- Next, we print out the “Withdrawing %d from account with balance %d”, value, amount. You can see that we are passing value and amount as parameters.
- Following this, we perform a computation
amount -= value
- Next, we unlock the mutex- mutex.Unlock(). Then we call wg.Done().
- In the main function, we define the WaitGroup.
var wg sync.WaitGroup
- Now, you have to perform a step here. Before you go on to create the goroutines, you have to focus on the addition of wgAdd(2) to this WaitGroup.
go extract(600, &wg)
go deposit(500, &wg)
- Following this, the main function has to be block, until the time the WaitGroups have finished. The final step is to print out the value from fmt.Printf (“New Balance%dn”, amount).
Output:
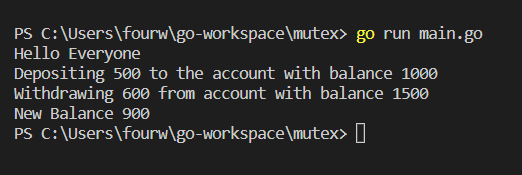
Understanding the Output
- In both the extract and deposit routines, we explicitly stated that the first action should be to acquire the mutex using the mutexLock() method. All of the functions will stall until one of them successfully acquires the lock.
- If it is successful, it will proceed and enter a vital stage when the account balance (amount) will be read and then updated.
- After finishing this procedure, each function uses mutex.Unlock() to release the lock.
- There are a few circumstances where you have to be careful while using mutex. This is especially true when calling unlock after generating the goroutines that have obtained the lock. Regardless of how the goroutines end, the unlock function must be invoked. If you don’t accomplish this, the program will come to a standstill.
I presume that you were able to understand the concept of mutex through the program decoded above. This is one of the most straightforward ways of applying reader-writer lock in Golang, where you can manage the private data inserted in the goroutines. If you wish to implement the concept of mutex, it is imperative that you practice once you have got the hang of it.
You May Also Read:
Here are the Top 5 HR Courses in Dubai
What is a BPO Call Center? Everything You Need to Know
Everything You Must Know About PMP Certification Cost in 2022
CFA Level 1: Frequently Asked Questions